快速入门
网络与 RPC
- Linea Sepolia
- chainId :
59141( 0xe705 ) - RPC : https://rpc.sepolia.linea.build
- 区块浏览器 : https://sepolia.lineascan.build
- chainId :
- Linea 主网
- chainId :
59144( 0xe6d0 ) - RPC : https://rpc.linea.build
- 区块浏览器 : https://lineascan.build
- chainId :
部署合约
部署一份完全兼容 EVM 的通用合约(示例:MessageBoard(链上留言板)),可使用 Forge 或 Hardhat 等开发工具完成。
curl -L https://foundry.paradigm.xyz | bash
# 安装 Foundry 工具链
foundryup
# forge
# cast
# anvil
# chisel

# 初始化项目
forge init MessageBoard

# 编译
forge build

# 部署合约
forge script script/Counter.s.sol:CounterScript --rpc-url <your_rpc_url> --private-key <your_private_key>npm install -g hardhat
# 初始化 Hardhat 项目
npx hardhat// SPDX-License-Identifier: MIT
pragma solidity ^0.8.20;
contract MessageBoard {
struct Message {
address sender;
string content;
uint256 timestamp;
}
Message[] private messages;
event MessagePosted(
address indexed sender,
string content,
uint256 timestamp
);
function postMessage(string calldata content) external {
require(bytes(content).length > 0, "Empty message");
require(bytes(content).length <= 280, "Message too long");
messages.push(
Message({
sender: msg.sender,
content: content,
timestamp: block.timestamp
})
);
emit MessagePosted(msg.sender, content, block.timestamp);
}
function getMessage(
uint256 index
) external view returns (address, string memory, uint256) {
Message storage m = messages[index];
return (m.sender, m.content, m.timestamp);
}
function getMessageCount() external view returns (uint256) {
return messages.length;
}
}你也可以手动部署合约,或者直接使用 Linea 测试网上的示例合约:
0x9abb5861e3a1eDF19C51F8Ac74A81782e94F8FdC
搭建 Dapp
通过 vite 构建一个简单的应用:
npm create vite@latest linea-dapp --template react-ts安装依赖
安装 MetaMask 嵌入式钱包 SDK 及其他必需包:
npm install @web3auth/modal wagmi viem@2.x @tanstack/react-query依赖列表:
@web3auth/modal:MetaMask 嵌入式钱包 SDKwagmi:React 状态管理库viem@2.x:Ethereum 客户端库@tanstack/react-query:数据获取库
安装完成后,你可以运行 npm run dev 来本地启动应用。
配置提供商(Provider)
在你的项目中创建一个使用 Web3Auth 和 Wagmi 的配置文件。这个文件将用于将你的应用状态与钱包和区块链连接提供商包裹起来。在你的应用 components 目录中,创建一个名为 provider.tsx 的新文件:
"use client";
import React from "react";

// Web3Auth Imports
import { Web3AuthProvider, type Web3AuthContextConfig } from "@web3auth/modal/react";
import { IWeb3AuthState, WEB3AUTH_NETWORK } from "@web3auth/modal";

// Wagmi Imports
import { WagmiProvider } from "@web3auth/modal/react/wagmi";
import { QueryClient, QueryClientProvider } from "@tanstack/react-query";

// QueryClient for Wagmi Hooks Configuration
const queryClient = new QueryClient();

const clientId = "YOUR_WEB3AUTH_CLIENT_ID";

// Web3Auth Configuration
const web3AuthContextConfig: Web3AuthContextConfig = {
  web3AuthOptions: {
    clientId, // Pass your Web3Auth Client ID, ideally using an environment variable // Get your Client ID from Web3Auth Dashboard
    web3AuthNetwork: WEB3AUTH_NETWORK.SAPPHIRE_DEVNET, // or WEB3AUTH_NETWORK.SAPPHIRE_MAINNET
  }
};

// Provider Component
export default function Provider({ children }:
  { children: React.ReactNode }) {
  return (
    <Web3AuthProvider config={web3AuthContextConfig}>
      <QueryClientProvider client={queryClient}>
        <WagmiProvider>
          {children}
        </WagmiProvider>
      </QueryClientProvider>
    </Web3AuthProvider>
  );
}
我们将使用 MetaMask 嵌入式钱包(Web3Auth)SDK 支持无缝认证,支持社交登录、外部钱包及更多功能。该 SDK 与 Wagmi 协同工作,提供完整的 Web3 认证与交互解决方案。
因此我们需要获取 clientId, 前往 dashboard.web3auth.io要注册一个免费的 MetaMask 嵌入式钱包账户.
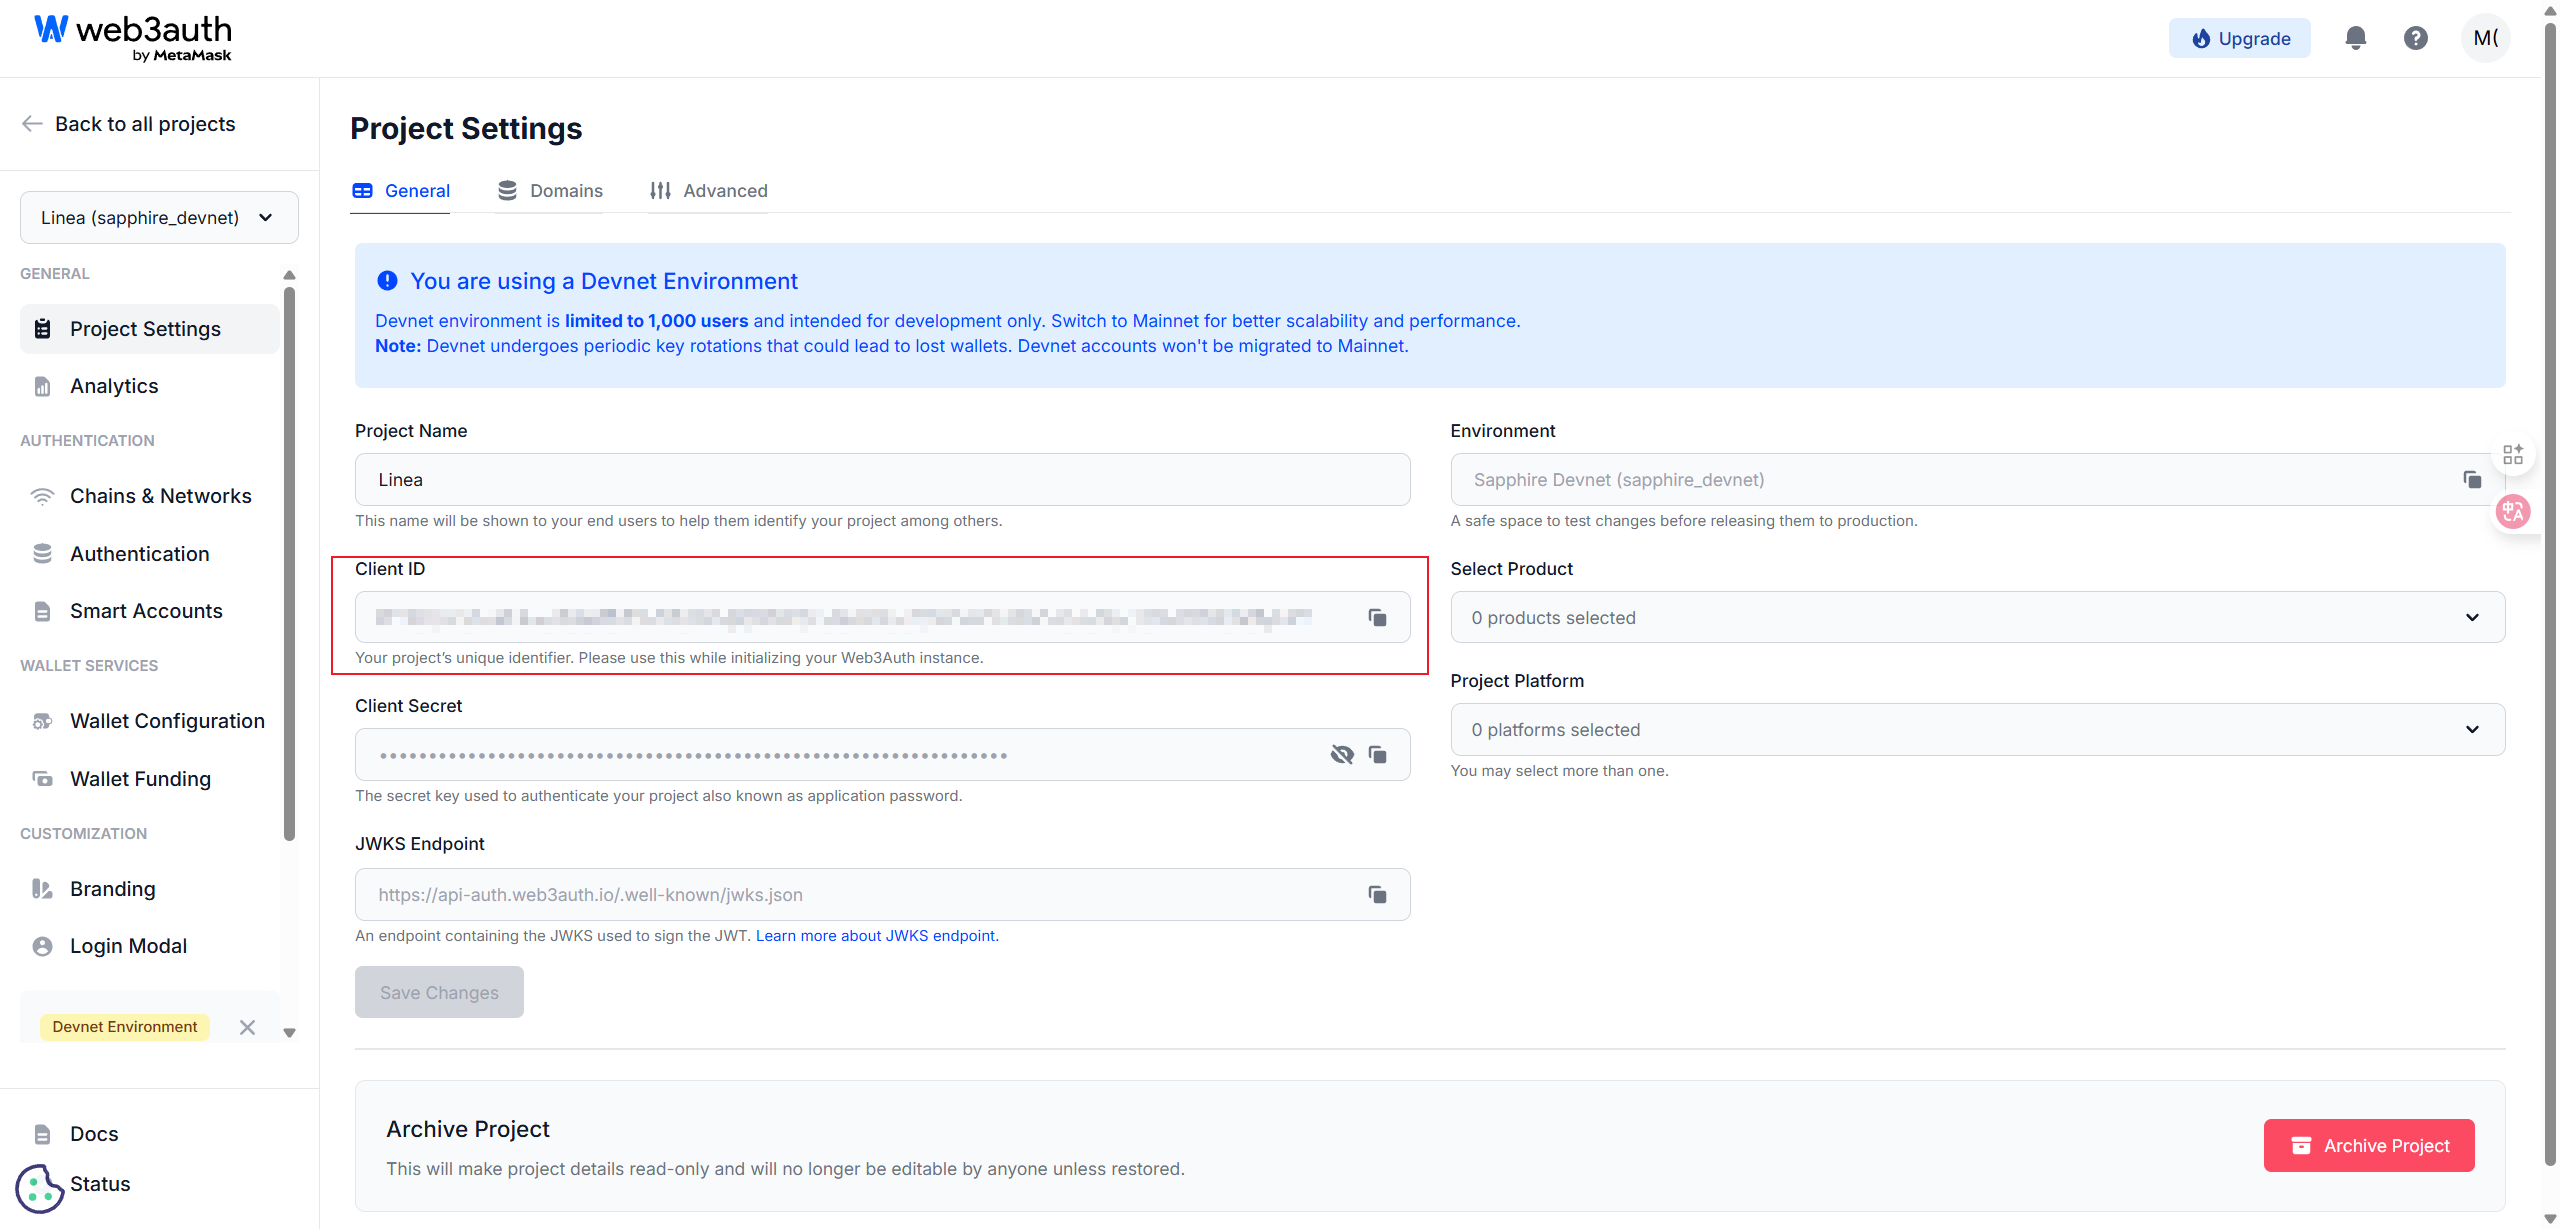
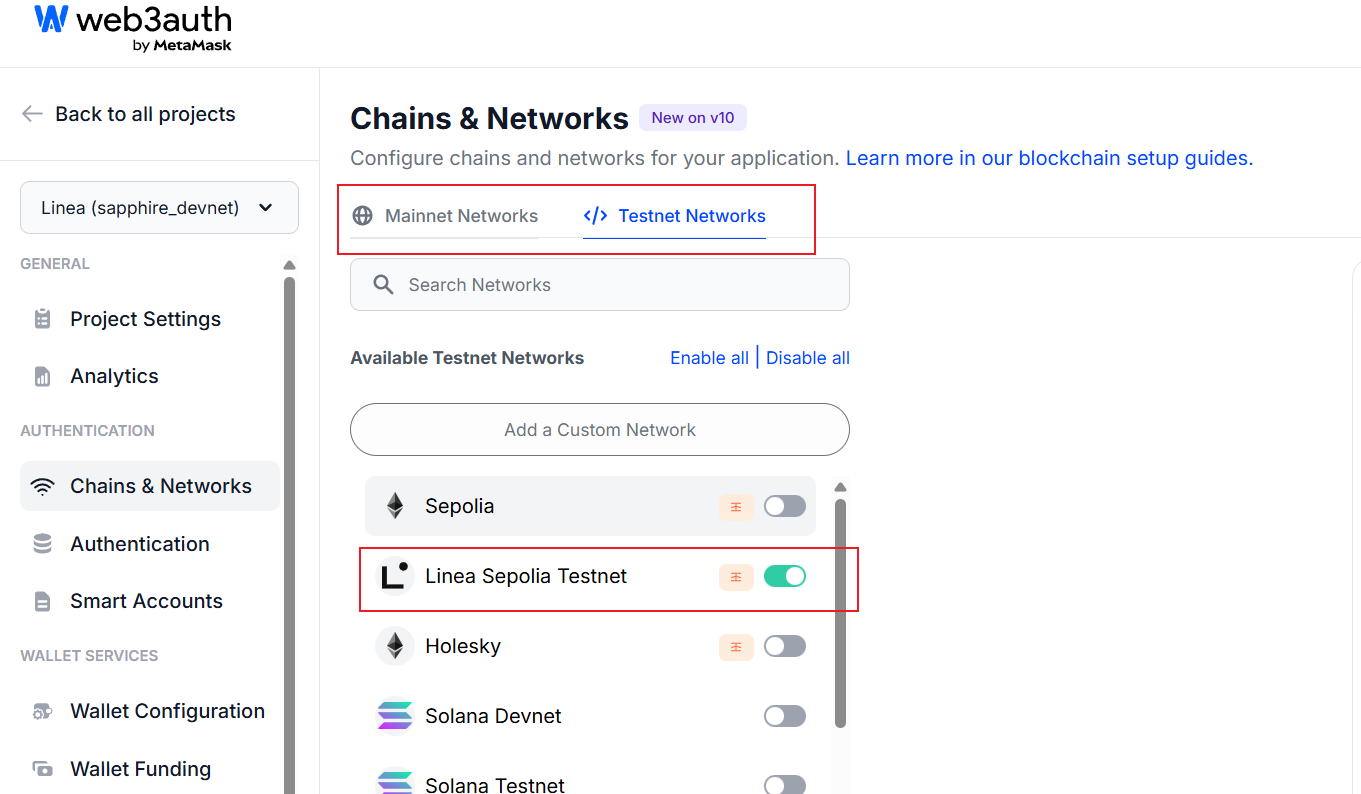
在仪表盘上启用 Linea 网络:
要启用 Linea 和 Linea Sepolia 网络:
- 登录 Web3Auth Dashboard。
- 导航到 "Settings"(设置)页面。
- 在 "Networks"(网络)部分,找到 "Linea" 和 "Linea Sepolia" 网络。
- 点击 "Enable"(启用)按钮,分别为 Linea 和 Linea Sepolia 网络启用。
应用提供商
在你的入口文件如 main.ts 使用组件 Provider:
import "./polyfills";
import { StrictMode } from "react";
import { createRoot } from "react-dom/client";
import "./index.css";
import App from "./App.tsx";
import Provider from "./Provider.tsx";

createRoot(document.getElementById("root")!).render(
  <StrictMode>
    <Provider>
      <App />
    </Provider>
  </StrictMode>
);
创建连接钱包按钮
创建一个简单的 Connect 钱包组件。在你的应用中 components 目录中,创建一个名为 ConnectWallet.tsx 的新文件:
// app/components/ConnectWallet.tsx
import { useWeb3AuthConnect, useWeb3AuthDisconnect, useWeb3AuthUser } from "@web3auth/modal/react";

export default function ConnectWallet() {
  const { connect, isConnected, loading: connectLoading, error: connectError } = useWeb3AuthConnect();
  const { disconnect, loading: disconnectLoading, error: disconnectError } = useWeb3AuthDisconnect();
  const { userInfo } = useWeb3AuthUser();

  return (
    <div>
      {!isConnected ? (
        <button
          className="docs-button"
          disabled={connectLoading}
          onClick={connect}
        >
          {connectLoading ? 'Connecting...' : 'Connect Wallet'}
        </button>
      ) : (
        <div className="flex gap-2">
          <span>Connected as: {userInfo?.email || userInfo?.name || 'User'}</span>
          <button
            className="docs-button"
            disabled={disconnectLoading}
            onClick={disconnect}
          >
            {disconnectLoading ? 'Disconnecting...' : 'Disconnect'}
          </button>
        </div>
      )}
    </div>
  )
}
集成连接钱包按钮
在你的应用中,将 ConnectWallet 组件集成到你的主应用组件中。例如,在 App.tsx 中:
// app/App.tsx
import ConnectWallet from "./components/ConnectWallet.tsx";

export default function App() {
  return (
    <div className="container">
      <h1>Linea Dapp</h1>
      <ConnectWallet />
    </div>
  );
}
连接 Linea 网络
自动切换到默认链(Linea)
// app/App.tsx
import ConnectWallet from "./components/ConnectWallet.tsx";
import { useChainId, useSwitchChain } from "wagmi";
import { useEffect } from "react";

export default function App() {
  const chainId = useChainId();
  const switchChain = useSwitchChain();
  useEffect(() => {
    if (isConnected && chainId !== 59141) {
      switchChain.mutate({ chainId:  59141});
    }
  }, [isConnected, chainId, switchChain]);
  return (
    <div className="container">
      <h1>Linea Dapp</h1>
      <ConnectWallet />
    </div>
  );
}
异常错误: Buffer is not defined
安装依赖:缺少Node环境的buffer
npm install buffer process编写 polyfills.ts 文件在入口 main.ts 文件导入
import { Buffer } from "buffer";
import process from "process";

const g = globalThis as typeof globalThis & {
  Buffer?: typeof Buffer;
  process?: typeof process;
  global?: typeof globalThis;
};
g.global ??= globalThis;
g.process ??= process;
g.Buffer ??= Buffer;
链上交互
使用 wagmi 模块的 useWriteContract, useReadContract 来跟合约进行交互。
import { useWriteContract, useReadContract } from "wagmi";
import { abi } from "../lib/abi";
export default function MessageBoard() {
  const activeChainId = 59141;
  // 读取链上留言总数
  const { data: countData } = useReadContract({
    abi,
    address: contractAddress,
    functionName: "getMessageCount",
    chainId: activeChainId,
  });
  // 写入新留言
  const writeContract = useWriteContract();
  const postMessage = (messageText: string) => {
    writeContract.mutate({
      abi,
      address: contractAddress,
      functionName: "postMessage",
      args: [messageText.trim()],
      chainId: activeChainId,
    });
  }
}export const abi = [
{
type: "function",
name: "getMessage",
inputs: [
{
name: "index",
type: "uint256",
internalType: "uint256",
},
],
outputs: [
{
name: "",
type: "address",
internalType: "address",
},
{
name: "",
type: "string",
internalType: "string",
},
{
name: "",
type: "uint256",
internalType: "uint256",
},
],
stateMutability: "view",
},
{
type: "function",
name: "getMessageCount",
inputs: [],
outputs: [
{
name: "",
type: "uint256",
internalType: "uint256",
},
],
stateMutability: "view",
},
{
type: "function",
name: "postMessage",
inputs: [
{
name: "content",
type: "string",
internalType: "string",
},
],
outputs: [],
stateMutability: "nonpayable",
},
{
type: "event",
name: "MessagePosted",
inputs: [
{
name: "sender",
type: "address",
indexed: true,
internalType: "address",
},
{
name: "content",
type: "string",
indexed: false,
internalType: "string",
},
{
name: "timestamp",
type: "uint256",
indexed: false,
internalType: "uint256",
},
],
anonymous: false,
},
] as const;